Showing posts with label Claritystamp challenge. Show all posts

Thursday, 1 December 2016

Carol Singing and Christmas Joy!

Hello there!  I can hardly believe that its December already.  Hope you're a bit more organised than me.  I've got a lot to do before I'll be ready for Santa!


This months theme over on the Claritystamp challenge blog is "Carol Singing and Christmas Joy" so you have plenty of scope to make a last minute Christmas card or gift.


I kept it very simple, so no step by step this month.


All stamping done in paradise teal archival.  The partridge was stamped first, then masked with a post-it note before stamping the tree into place.  I used a quickie glue pen  to add some glitter to the leaves and coloured the partridge with my polychromos.


I then stamped the words into place using the word chain alphabet and some of the word chains.  Glitter round the edges and mounted onto a co-ordinating card blank, and voila!!!


Looking forward to seeing all your entries this month.  Its always exciting to see what you come up with.  Don't forget the winner gets a £50 Clarity voucher;  now think how nice that would be...  just in time for the half price members sale!


Hopefully I'll be back soon for a closer look at the samples I've made for this weekend's Claritystamp shows on Hochanda.  The new stamps are just fabulous.  Till next time.  Xxx

Tuesday, 1 November 2016

A blast from the past - keeping it clean and simple


Hello there!  Its been a while...


I can't believe its 1st November already.  Where does the time go?


This month, we're doing something a bit different over on the Claritystamp challenge blog.  So go on, pick your favourite theme from one of our previous challenges and create a new project.


I decided to go with "Clean and simple" from November last year.


Put the hexagon stencil in place on a 7" x 7" piece of stencil card.


 Brush wild honey distress ink through the aperture, concentrating around the edges and defining them with a make-up sponge, and keeping the centre a bit lighter.


 If you hinge the stencil at the top of the card with low tack tape, you can check your progress.


 Replace the hexagom 'outie' and use the honeycomb 'innie' from one of the square aperture stencils to add some detail, brushing through more wild honey distress ink.


I  used the word chain alphabet and the bee from the agapanthus set designed by Jayne Nestorenko to stamp my sentiment in black archival.


I added a drop shadow with a grey distress marker.


Coloured the bee with my Faber Castell polychromos and added a teeny bit of Glamour Dust glitter to the wings.


All that was left to do was to run a black sharpie round the edge and mount onto a card blank.  I hope you like it.


Its going to be so exciting this month.  I can't wait to see your projects and your favourite themes. 


Don't forget, you could win a £50 Clarity voucher;  but you've got to be in it to win it.  So, go on, why don't you give it a go.  Till next time.  Xxx

Saturday, 1 October 2016

Going round and round in circles!

Hello there!  Just popping in to share my project for this month's Clarity challenge.  The theme this month is to use circles or squares in your artwork.  Why don't you pay a visit to the Claritystamp Challenge blog where you'll find inspiration throughout the month from my talented teamies. 

Don't forget that there's a £50 Clarity voucher up for grabs.  The winner is chosen at random, so everyone has the same chance to win.  Go on...  give it a go!

Time has run away with me this month, so there's no step by step this time.  Its quite an easy one though.


Tape the stencil into position onto a piece of 7" stencil car and mask off the central square with a post-it..

Brush worn lipstick, picked raspberry and wilted violet distress inks through the stencil.  The colours blend together beautifully.  A final bit of blending with a make-up sponge will help to ensure the stencil design is crisp and defined.  

Remove the stencil and mask the outer edges of the central square. 

Stamp the fuchsia into place with black archival, and another twice onto a small piece of stencil card.

Using a compass, mark the circles for the decoupage and cut out.  This is the only part of the fuchsia design that was coloured in;  the rest was left in black and white.

All that was left to do was trim the artwork back slightly and edge with a ruler and a black sharpie pen; before sticking the decoupage circles into place with pinflair glue gel. 

I really like the combination of Jayne Nestorenko's beautiful floral designs with the funky stencil frame;  I hope you do too. 

Off to Port Sunny today.  Hope to see some of you there.  Then, Barbara Gray will be back on the TV on Sunday and Monday.  There are some real treats in store for you.  Hold onto your credit cards!!!  Till next time.  Xxx
Thursday, 1 September 2016

In the garden...

Hello there!  I can't believe August is over already.  Time passes by so quickly...  And not just this year either;  I celebrated my birthday on 13th August, and find myself asking wondering how on earth I've reached 50!!!

Anyway, enough pondering;  its 1st September and that means its time for a new theme over on the Claritystamp Challenge blog.  This month, we're asking you to produce artwork on the theme of  "in the garden."

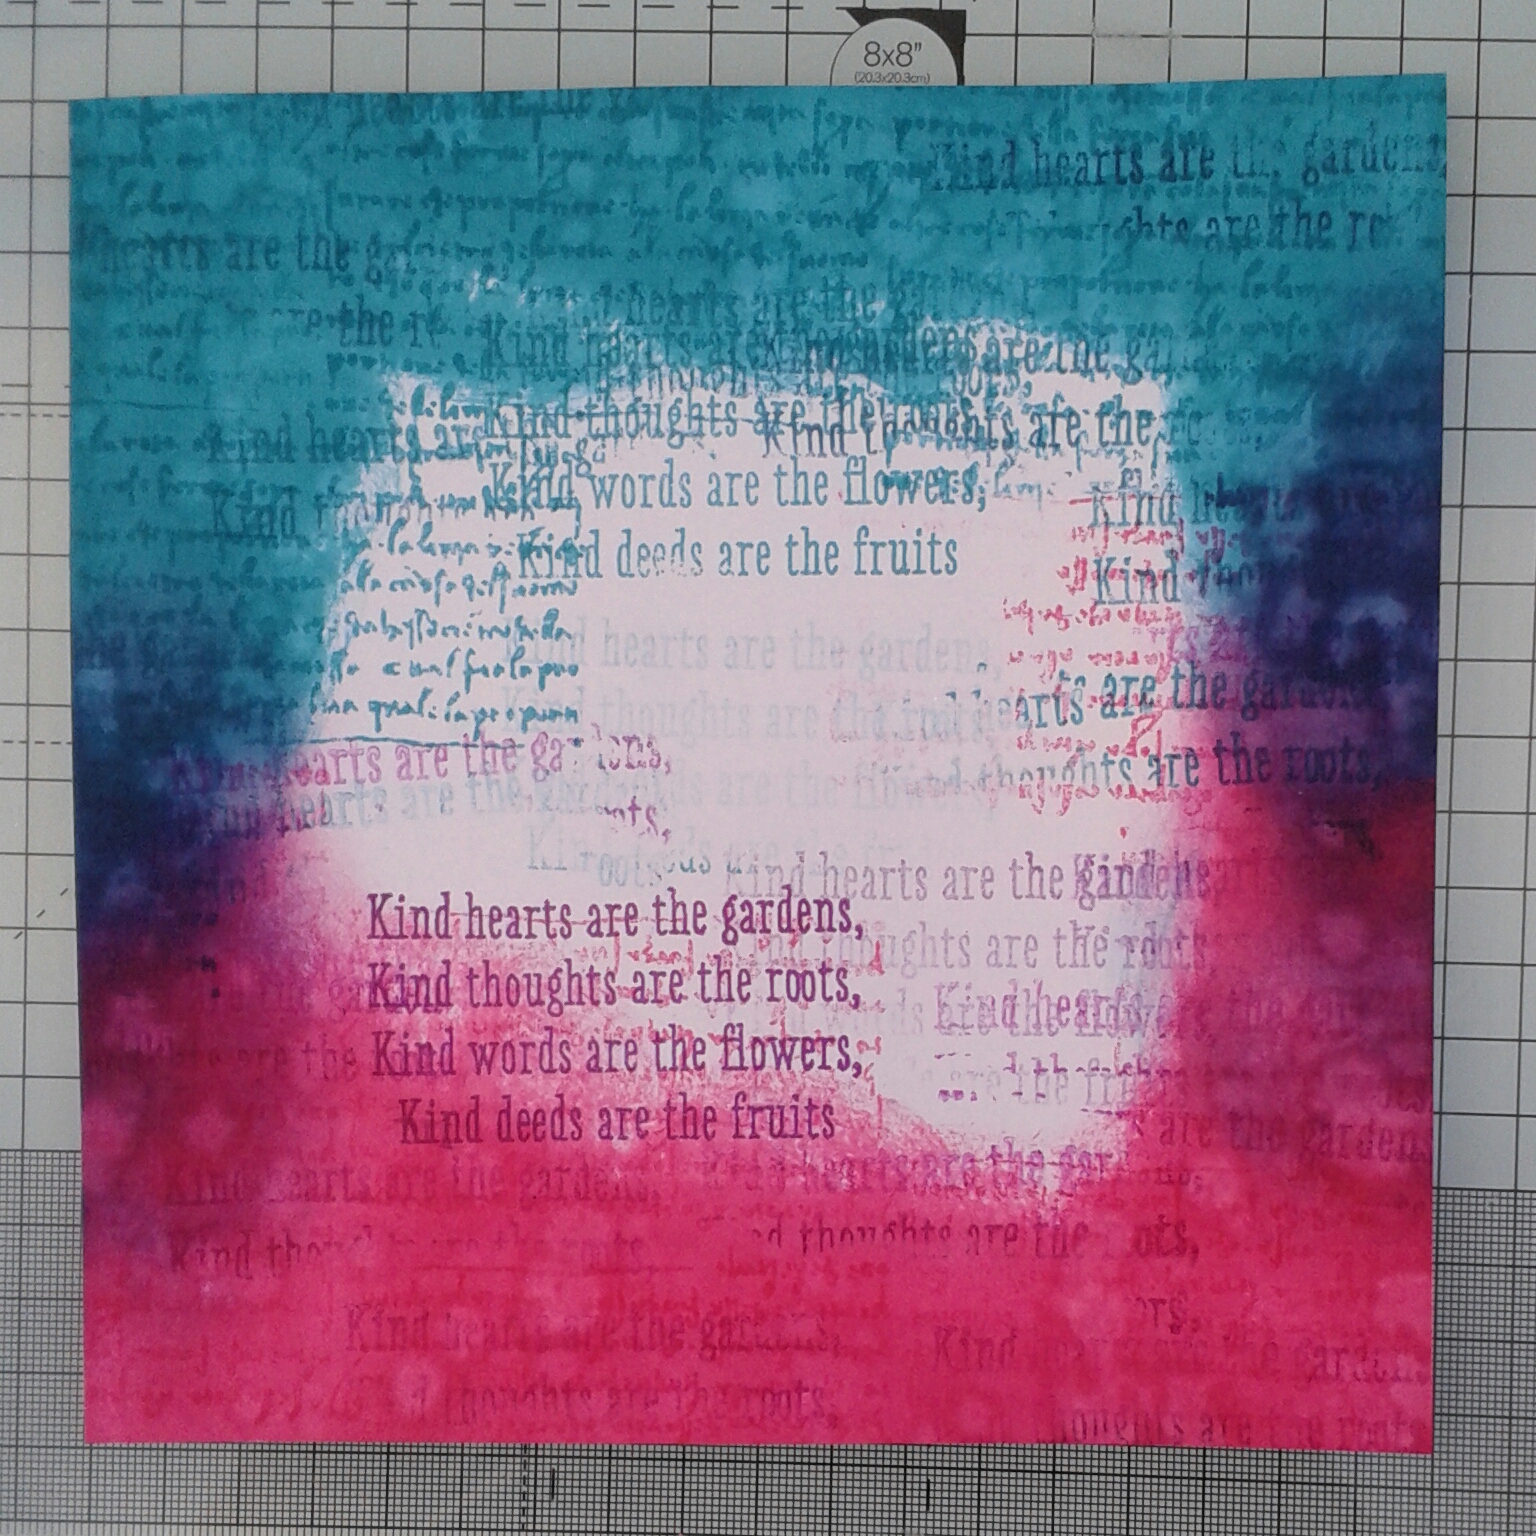
I took my inspiration from the beautiful verse:  Kind hearts are the gardens, kind thoughts are the roots, kind words are the flowers, kind deeds are the fruits.

Using garden patina archival ink I stamped the Shepherd's Purse into place, then stamped the verse in sections.  I did this by covering up the other parts of the stamp with a post-it so I only inked up the section of the stamp I was working with.


Next I coloured in the flowers and leaves using my new Faber Castell polychromos.  I am a very, very lucky girl as my husband Martin bought me the full set in a beautiful wooden case for my birthday:  best present ever! 


Here is a little detail below.


Then I used a versamark pen and kaleidoscopic embossing powder to glaze the flowers and leaves.  I did 2 coats to ensure full coverage and a nice even finish.


I positioned the heart stencil and used low tack masking tape to secure in place.


Using Picked Raspberry and Peacock Feathers distress inks, I brushed these gently through the stencil;  concentrating along the diagonal top right to bottom left.  The embossed areas will resist the ink which can then be gently wiped away.


I replaced the stencil and did a little bit of random stamping using the same colours using the script stamp from the journaling set.


I decided to colour my own card to mat the finished artwork.  Using the same inkpads, I smeared the colour directly around the edges of the card, blending with a make-up sponge where the colours meet.  I sprinkled with water and blotted with kitchen roll;  this lifts a bit of the colour and adds texture.


I added further texture by randomly stamping with both the script stamp and the "Kind hearts" stamp.


All that was left to do now was to mat and layer onto a card blank.


I hope you like the finished card;  quite simple and enjoyable to do.  If you still need more inspiration pop over to the Challenge blog to look at the work done by my talented teamies.  Even if you've never joined in before, why don't you give it a go;  the winner is chosen at random, so whether you're a beginner or have been crafting for years you could still win a £50 Clarity voucher.  Now wouldn't that be nice?

I'm hoping to be back soon with the samples I've done ready for this Sunday's Clarity shows on Hochanda.  Till next time.  Xxx


Monday, 1 August 2016

I do love a bit of fussy cutting...


Hello there!  Really sorry not to have had chance to catch up sooner, but its been a very busy couple of weeks for me at work.  And its the start of August already, and time for a new theme over
on the Claritystamp challenge blog.  This month we're showcasing a technique which you'll be able to do with either stamps or groovi:  fussy cutting.  

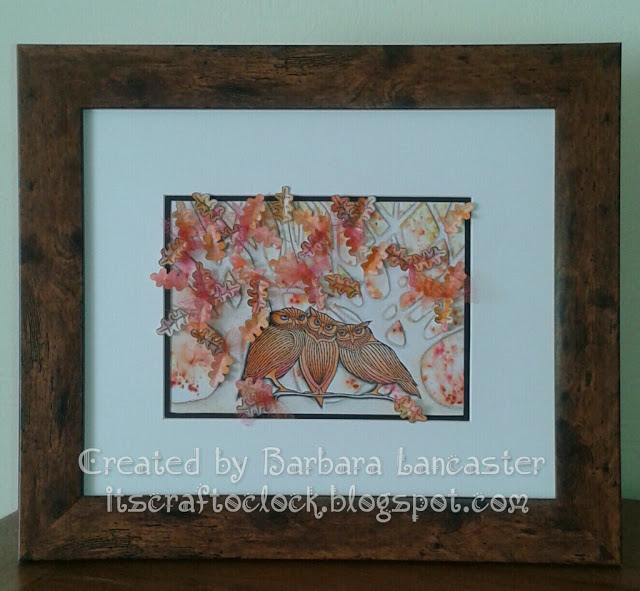
So here goes with my project;  inspired in part by last month's NDC stencil projects. I loved this stencil as soon as I saw it.  I started off by stamping the owls into place using black archival and covering with a mask.


I used the gelli plate with chalk Freso Finish acrylic to pull a print of the trees.  This dries almost immediately, so then I spritzed the paper, replaced the stencil and sprinkled on some Colour Bursts.  I used orange, with a tiny bit of yellow and hot pink.  You have to be a bit careful not to add too much water or the colour will spread too much under the edges of the stencil.


I kept the mask in place over the owls and used gold acrylic to pull another gelli print of the trees.  The mega mount is invaluable for perfect positioning every time when you are layering prints like this.  The gold just adds a very subtle shimmer to the trees.

I still felt that the trees needed more definition, so I set to work with my spectrum noir pencils, mainly in shades of grey.  I did this over a few days, just a bit at a time to make sure I didn't overcook it.


Plenty of shading round the owls brings them to the foreground and gives a real 3d effect.  It adds drama too, I think.


I made some background pieces by smearing distress inks in similar colours onto a blending mat and spritzing with water, before picking up with a sheet of paper.  Personally, I like to layer and dry each colour separately, rather than blending them together on the mat, as I find they're less likely to go muddy.

I then used these pieces to stamp out some oak leaves, then cut them out and started to experiment with where to place them.

I also coloured in the owls with spectrum noir pencils in shades of orange and hot pink.  For me the touch of pink intensifies the warmth and vibrancy of the orange. 


At this point I also decided to add in little snippets of orange and hot pink tulle along with the leaves.  They were all stuck into place using Prima 3d gloss gel.


You can see some details below, and then the finished piece which I mounted in a wooden frame.


I made this for my dear friend Maria Simms' birthday.  I won't see her until the 6th, so I really hope she'll like it.  She's been warned not to peek if she wants it to be a surprise!

I hope you like it too, and that I have given you some inspiration for your own project.  What will you do?  I can't wait to see...  Don't forget you could win a £50 voucher to spend on Clarity goodies.  But you have to be in it to win it, so go on give it a go.  Till next time.  Xxx 


Friday, 1 July 2016

A fairytale day out


Hello there.  Well the best laid plans, good intentions and all that...  so much for blogging!  Its the 1st July already and so its time for a new theme over on the Claritystamp challenge blog.  Why don't you pop on over and look at all the fabulous inspiration from the rest of the design team?  This month's theme is "a day out:"  so where are you going to go to?  The seaside?  The countryside?  The city?  Its up to you!

I decided to take a fairytale trip to the land of far, far away.

I used a little Creative Expressions mdf shrine as the basis of my project.  I started by painting the back panel with white gesso.


I stamped the castle from the Happily Ever After set onto copy paper so I could decide on its position.  Then I put a moon mask into place.


I put the treeline mask into place, to provide a forest background for the castle.

Then I started to brush distress inks into place for the sky:  picked raspberry and wilted violet used here.


More distress ink added;  blueprint sketch this time.


Then I covered up the sky with the other half of the treeline mask. 


I sponged in the trees with green distress ink.  I put the moon mask outie into place and added a little mustard seed distress ink.


I then used the treeline stamp to add in some more trees, this time in green archival.


Then I stamped the castle into place with black archival.


I then stamped the castle again in black archival onto some stencil card and added some subtle colour with spectrum noir pencils.  I added a delicate shimmer by applying a thin coat of DecoArt Interference Magenta which gives a pearlised effect.


This was cut out and mod podged into place.


The rest of the mdf was coated in black gesso.  I set to work now on creating a colourful, floral background for the front of the piece.

I started by spritzing mustard seed, picked raspberry and mermaid lagoon distress inks and schmoosing them around onto stencil card.  I find I get better results by working with each colour separately and drying the card in between;  the colours seem to stay truer, with less risk of muddying into one another.


Then I stamped the flower bouquet randomly in the same colours.  For this sort of thing, I often work freestyle with the stamp in my hand for a less perfect result.


This piece was then cut to cover the front of the shrine.  I drew round one of the tree framer stencils and cut it out.  As the card was textured, I added a little bit of interest with a tiny touch of gilding wax.


You can see here that I had stamped Alice onto a piece of stencil card, coloured her in and cut her out.  Then I started to lay out possible compositions until I found one I was happy with.


I used some Sweet Lilac flowers, coloured to match my project with diluted distress inks and glued them into place.

You can also see how I gathered some organza ribbon to make a grassy bank for Alice to sit on and added a little fairy toadstool.


I made tiny bunting using the letterbox shapes on shrink plastic and a couple of teeny weeny fairies (also shrink plastic) to hold it in place. 


Let's take a closer look and check out some of the details.


An Angelina fibre butterfly was the final finishing touch.


And here's the final finished piece...


I hope you like it.  I am so looking forward to seeing where you each of you will be taking us for a day out. 

Don't forget, the winner of the £50 Clarity voucher is chosen completely at random, so why don't you give it a go and join in.

I'm looking forward to a wonderful crafty weekend;  a Clarity workshop with Maria Simms at Shrewsbury on Saturday and Barbara on the telly on Sunday.  You're going to love the new stamps and stencils.  So this time I promise I will back soon.  I have one of my samples from the show in particular that I want to share with you.  Till next time.  Xxx