Saturday 23 January 2016

Toucans... better together...

Hello there, and welcome to my new look blog.  I hope you like it, and that you find the links and other features I've added helpful.  A huge thanks to my dear friend Emma Burns whose tips and advice have made it all possible.
 
I thought I would share this card I made for step son's 30th birthday at the beginning of January.  Can you guess the tipple of choice for the celebrations?
 
 
 I had made the background a while ago using a technique that Pauline Butcher demoed at Port Sunlight last autumn.  I sprinkled colour bursts onto a piece of stencil card, then sprayed on ordinary spray starch.  A piece of cling film was scrunched over, then the piece was set aside to dry.  Barbara Gray does a very similar trick using just water on coated Clarity cardstock;  you can check out her You Tube video here.  With the spray starch you can use any cardstock, and I find if anything the cracked effect is intensified. 
 
I stamped the toucans into place in the centre of the card using black archival.  I also stamped them again onto a scrap of stencil card, and onto a post-it so I could cut out a mask.
 
Once I had masked off the toucans, I pulled grunge paste through the olive wreath stencil and set aside to dry.
 
I replaced the stencil, and sponged through distress inks.  I'm not 100% sure of the colours I used now, but I think it might have been spiced marmalade, faded jeans and twisted citron.  These merge and blend beautifully.
 
I coloured the toucans on the scrap piece of card using spectrum noir pencils and glued into place.
 
The edges were finished with a ruler and a black Sharpie pen, before mounting onto a card blank. 
 
 
Thanks so much for visiting.  I'd love it if you could take the time to leave a comment.  I read and value them all.  Till next time.  Xxx   


Friday 22 January 2016

For my friends...

Hello there.  You'll see that I have made a couple of small changes since I last blogged.  I'm moving over to Google+, so you'll be able to follow me there:  and it'd be great if you would.  Then, you'll see that I have put in links to the products I've used.  These will take you straight to the Claritystamp website.  I hope that this will make it easier for you to find items you might be looking for. 

The other change is that I have added in links to the blogs of the rest of the Clarity, Groovi and Challenge design teams.  You'll find these listed under "My Favourite Blogs" if you scroll right down to the bottom of the page.  This will make it so much easier for you to visit all their blogs for loads of inspiration and ideas on how to use all your Clarity goodies, and of course, to keep up with all the latest Clarity news from the lady herself:  Barbara Gray.

I've been working on projects for upcoming birthdays and celebrations that I can't share yet, and starting on my samples for Barbara's TV show on Hochanda on 7th Feb.  So, just because I wanted to talk to you, I thought I would share these projects I made a while ago for some of my friends.

You'll find the links to the stamps/stencils used under each photo.
 
 
I hope you like them, and that maybe you'll find inspiration for a project of your own.  If you do, please leave a comment (if you can manage a photo too, that would be even better), and let me know.  Till next time.  Xxx

Saturday 9 January 2016

Claritystamp One Day Wonder Shows - 4th Jan 2016

Hello again.  Here as promised are my samples from the One Day Wonder shows.  I'm not surprised that you all went mad for the wee shops and houses.  They're fab aren't they?


New Home


As soon as I saw these stamps I knew I wanted to do a new home card incorporating the word chains and using one of the houses as an "O"

Loads of masking involved in this one so it was out with the post-its!  I figured out on a piece of copy paper what I wanted to do, then cut a piece of card to size and masked off the frame before stamping the sentiment into place with black archival ink.  You just need to cover up with a post-it the part of the stamp you don't want ink on, then remove it before stamping onto the card. 

Then I drew in the border with a black micron pen, and covered up this middle section while I stamped the houses and shops into place.  First the row at the bottom, leaving some gaps and staggering them so I got variation in height.  These were then masked off before I stamped the second row.  Once the masks are removed, this makes the first row look they are in front of the others.  I just kept adding rows of houses until I had filled the frame. 

I chose a green and blue spectrum noir pencil to colour in the background, leaving the houses and shops completely white.  As Barbara said, this really makes the images pop.  Just black Sharpie pen around the edge to finish.

A walk in the park


Making this card proved to be anyyhing but a walk in the park, and it was nearly consigned to the reject pile, aka, the bin!!!!!!

First, I figured out the layout on some copy paper, made faint pencil marks on the stencil card to help with the positioning of the wee houses which were stamped in black archival.  These were then masked off, so I could brush through one of the abstract squares stencil with mermaid lagoon and twisted citron distress inks.  So far, so good.  Now for the trees...  and a disaster with a second generation one plotted at the right hand side.  For a while I wasn't sure what to do;  I just knew I didn't really want to have to throw it away.  In the end, I trimmed the piece right back to chop of the offending tree and brushed the same inks through the same stencil onto a separate piece of card, so that the stencil design continued almost seamlessly onto the background card. 
 
A couple more trees were added using a custom ink pad made with the same colour distress inks, then the cyclist and a couple of grasses were added to the foreground.  A little bit of colour was added to the houses with spectrum noir pencils and a black sharpie pen used to edge the central piece before mounting in place.
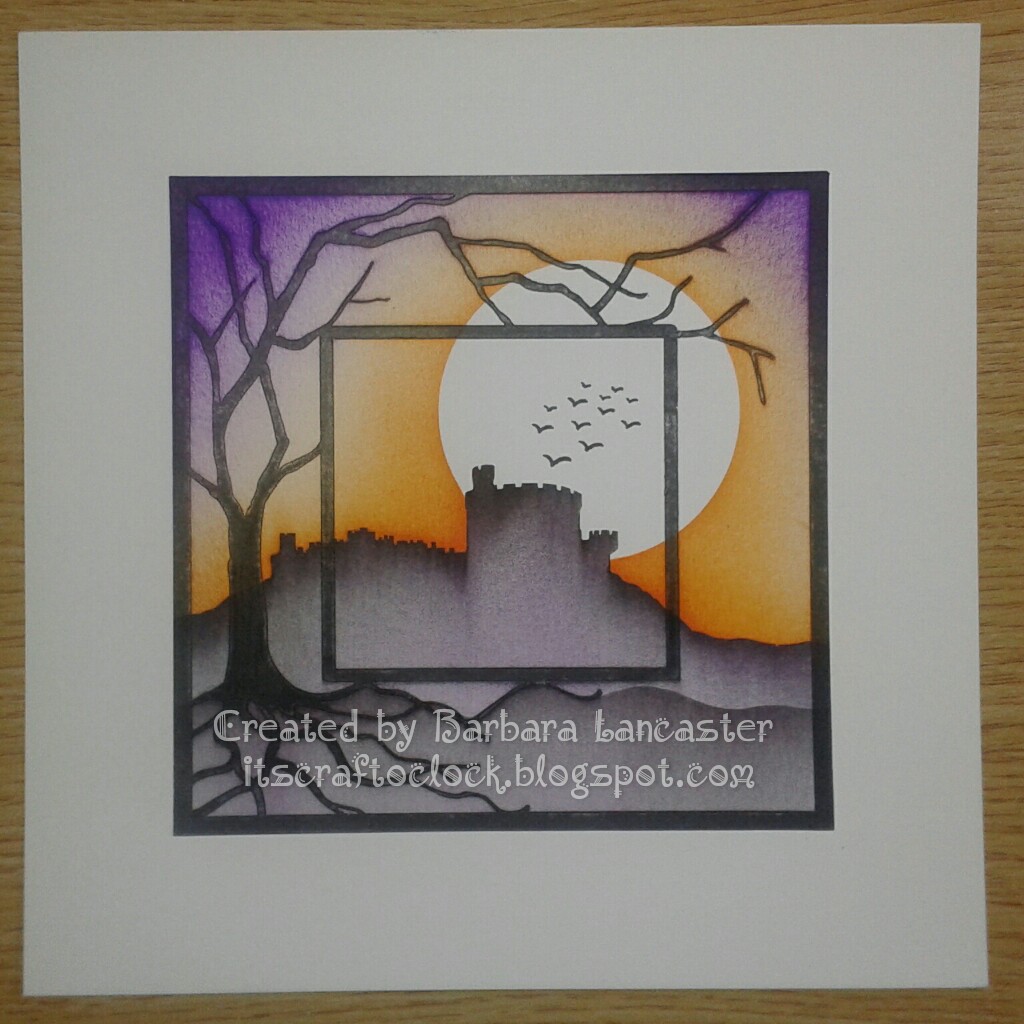
 
Magical
 

This desgn waa inspired by a Clarity challenge DT piece I made a while ago.
Click on the link above to take you to the original project if you want another look.
 
This one was done with inks rather than paint.  First I pulled grunge paste through the star stencil.  Once this was dry I put the crescent moon mask into place and started brushing and blending the inks, working in a circular motion.  I used squeezed lemonade, picked raspberry and blueprint sketch distress inks.  It does take time to build up this intensity of colour, but its worth it I think.  Then I very lightly dry brushed a tiny bit of gold acrylic paint to highlight the stars.
 
Simple torn paper hills and first and second generation stamping in black archival create the scene.  And that should have been it.  At least until I spluttered and left a couple of splodges.  I'm sure you can guess where they are...  yes, under "Magical" and a couple of the decoupaged stars.  Sometimes needs must!  Some glitter added the final finishing touch.
 
Thanks for so many lovely comments about these cards.  I'm glad you like them, and I hope they give you a bit of inspiration for your own work.  Till next time.  Xxx 
 

Monday 4 January 2016

Barbara's Claritystamp show - 3rd Jan 2016


Hello there.  Hope you managed to tune in and watch Barbara Gray working her Clarity magic on Hochanda on Sunday afternoon.

Here are my samples from the show.


Birthday bunting


As Barbara said, this is a real less is more card.  It might look simple, but there were a few rejects along the way!  Mainly to do with learning to build up the colour gradually so it didn't seep under the mask (how does she know this?).  For the larger bunting, I  sponged through with black soot distress ink to create the shadow.  I then blended squeezed lemonade, picked raspberry and mermaid lagoon distress inks for the bunting:  the smaller one was done directly on to the card, the larger one onto a separate piece and cut out and decoupaged (slightly offset so you can see the shadow underneath).  All I needed to do now was to stamp the word chain in black archival and add the shadow to the smaller bunting with a black micron pen.  


Spooky castle


First job was to coat the stencil in black archival and run through my embossing machine.  I put the large moon mask and castle mask in place.  The sky was brushed in with wilted violet and carved pumpkin distress inks.  I then used the other half of the castle mask and covered up the sky while I brushed in the castle with a little wilted violet and black soot distress inks.  I defined the skyline by sweeping downwards using black soot on a make-up sponge.  I then added in a further hill in the foreground again using black soot distress ink.  The mask for this was hand cut from copy paper to match the root line of the tree.


 Rainbow houses


I have to admit to being a bit obsessed with this mix of squeezed lemonade, picked raspberry and mermaid lagoon distress inks at the moment.  I simply blended the inks through the stencil, roughly pulled through some clear embossing paste from left to right, not worrying about getting full coverage as I got over to the right hand side.  I then removed the stencil and simply sprinkled on clear micro beads and a tiny amount of Glamour Dust glitter, graduating the coverage again from left to right, and set aside to dry overnight.  The same distress inks were blended onto centura pearl card and sprinkled with water for a co-ordinating background.  Its very subtle, but I also stamped the wee houses randomly over this background in the matching distress ink (blotting and plotting the pink and the blue so the effect remained delicate).
 
Grungy houses
  
 
This piece was made in a very similar way to the rainbow houses above, but I've achieved a very different look here.  I started by collaging old book pages onto the background piece of card and then spraying with distress stains and brayering over Paperartsy fresco finish acrylic paints.  Then I pulled through grunge paste and randomly sprinkled on some Frantage embossing powder.  This was melted once the grunge paste was dry.  I replaced the stencil, and highlighted the doors and windows with scattered straw distress ink, the roofs with spiced marmalade and the houses themselves with crushed olive distress ink.  I made the background by brayering these same colours onto my craft mat and spritzing with water.
 
Car and cogs
   

First, I brushed and blended wilted violet, mermaid lagoon and twisted citron through the clockwork stencil.  Then I used one of my Clarity wheelie stencils as a template to mark the centre and cut out the circle and window.  I had a fun shaving foam session using the same colour distress reinkers for the base card.  I planned the layout and positioning carefully on some copy paper before putting ink to my favourite shaving foam piece.  Black archival ink sponged through the stencil, having masked off the surrounding area and the word chains simply stamped;  although I did curve these a little as I put them on the mounts to make them fit the circular design a bit better.   Black sharpie pen round the edges and a brad in the centre to finish.

Thanks for all the positive feedback I've had about these cards.  Every time the deadline to send in the samples approaches, I still have a little wobble about whether what I've done is good enough, so I really appreciate all your lovely comments.  I'll be blogging the rest of my cards soon so please pop back for a look.  Till next time.  Xxx


Friday 1 January 2016

New Year... new Clarity challenge...


Hello there, and happy new year!  

I hope you had a wonderful Christmas, and I hope you will make many happy memories in 2016.  

This months Claritystamp challenge is:  Say it with flowers.  What a great theme for a feminine card suitable for any occasion.  I'm sure you'll all be brimming with loads of ideas.  Maybe Santa has been good to you, and you have some new stash you could use.  

 
I decided to make a card for a work colleague who left just before Christmas.  She loves her high heels, so it was the perfect opportunity to dig out this stamp (not quite the first, but certainly an early addition to my Clarity stamp collection)!!!  

I stamped the shoe in deep purple archival and cut out post-it masks.  

I also needed masks for the daisy bouquet.  

The daisies were stamped through the mask onto the shoe, and into the two opposite corners, masking as required.  This was also done in deep purple archival.

To colour the flowers I blended squeezed lemonade, picked raspberry and mermaid lagoon distress inks.  

I added a little bit of shading to the shoe with a spectrum noir pencil. 
 
I printed the words out on the computer and doodled the borders with wilted violet distress marker before cutting out.  These were then glued in place with a few fussy cut flowers.

I rubbed gilding wax and added a bit of glitter to the edges before matting and layering onto a DL card blank.
 
If you need any more inspiration, pop over to the Claritystamp challenge blog to look at more great projects from my talented teamies.  I hope you'll join in and look forward to seeing your creations.    The winner of the £50 Clarity voucher is picked at random, so everyone has a chance...  and you've got to be in it to win it!  Make 2016 the year you give it a go!  Till next time.  Xxx