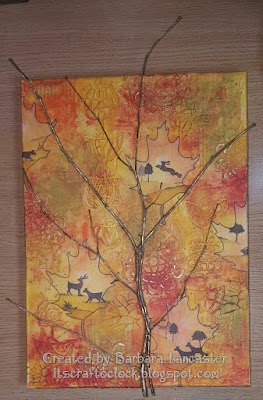
Hello there. Its been a while...
I thought you might like to see how I made the canvas that was on the last Claritystamp One Day Special shows on Hochanda.
Its not so long ago I would have been terrified of starting out on a big project like this, but with this sort of art you can just go for it without worrying too much. When you break it down step by step, its not scary at all; so if you want to, you should definitely try out a project of your own.
It's easier working on a canvas board, but for this project I needed a stretched canvas. You'll see why later.
I stamped the leaf onto tissue with grey archival ink and mod podged onto the canvas. This helps with the layout and positioning of stencils and colours later on.

Next stop was to pull grunge paste through the stencil. We're not looking for perfect here; just texture.
I tried some random stamping with brown archival using the text from the journalling set.
After a coat of white gesso, I started to flood on some colour with diluted Paperartsy Fresco Finish paints. The advantage of using these over watercolours is that once dry, the colours are permanent, so they don't go muddy.
I mod podged on some old book page scraps, and using a different stencil, added more grunge paste.
A slightly darker colour starts to add depth.
To apply the paint, first thin it down with a bit of water. Spray the area on the canvas where you're going to apply the paint, so that when you add the paint it can spread and move more freely. And if you want to thin it out and make it spread even more, then just spray again.
Allow each layer to dry before adding the next.
Some little splatters are good too. I made sure to keep the background paler where the leaves are going to be placed.
Keep going until you're happy. I lost count of how many layers I used here. Most of the time is spent waiting for the layers to dry, so this is an ideal project to have on the go while you're working on other masterpieces!
Now I laid out the twigs that will provide the main structure of the design and planned out each of the little landscapes in the leaves on some copy paper.
Then I painted on some areas of crackle glaze; varying the thickness. The crackle effect will develop as the glaze dries; a thinner coat gives a more delicate effect, the cracks will be larger where the glaze is thicker.
Next job was to make my leaves. To avoid any potential issues stamping directly on the canvas, I stamped these onto deli paper using black archival. The sky and landscapes were also done with archival inks to make sure the colours wouldn't bleed when decoupaged onto the canvas (I used DecoArt matte medium); and how do I know this? Let's just say it's a good job I did a little trial run.
Once I'd decoupaged the leaves into place, I attached the twigs with some fine wire; simply by piercing 2 small holes in the canvas and threading the wire through (hence the need for a stretched canvas rather than a canvas board on this occasion).
In the details below, you can see that I rubbed over the crackle glaze with antiquing cream.
Finally, I coated the canvas with a couple of coats of matt varnish before adding a few highlights with gilding flakes.
I hope you like the finished piece, and that maybe you feel inspired to try out something similar for yourself.
I'll try not to leave it so long for my next post. Till next time. Xxx


